Raspberry Pi2にOpenVPNをインストールしてみた(事前準備編)
Raspberry Pi2にUbuntuをインストール
使用するOSはUbuntuにしてみました。RaspberryPiの公式サイトにあるのはUbuntu MATEで、インストールをGUIで行う必要があるっぽいです。そうなるとモニターやキーボードを用意しなければいけないため却下。いろいろ調べて見ると、Ubuntu Pi Flavour MakerというサイトでRaspberry Pi用のUbuntuのOSを公開しているようです。

Download | Ubuntu Pi Flavour Maker
今回は「Ubuntu Server (standard)」を使ってみます。Ubuntuをダウンロードしている間に、micro SDカードのフォーマットを実施します。
micro SDカードのフォーマット
mac標準ツールのディスクユーティリティを使ってフォーマットを行います。ディスクユーティリティを起動して、SDカードを選択し「消去」。
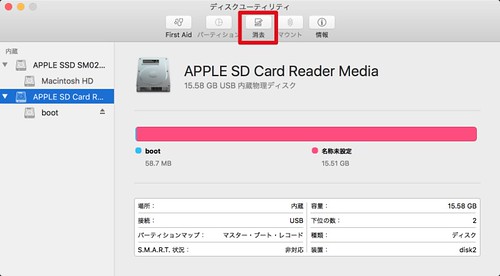
以上でフォーマット終了です。
Ubuntuのインストール
ダウンロードしたUbuntuイメージはxz形式で圧縮してありますので、「The Unarchiver」等の解凍ツールを使って解凍します。
ここからは以前紹介した「Raspberry Pi2 Model Bにディスプレイとキーボード無しでOSをインストール」と同じ方法でOSをSDカードに書き込みます。
書き込みが終了したらRaspberryPiにSDを差し込み起動させます。デフォルトのユーザ名とパスワードは以下の通り。
ユーザー名:ubuntu
パスワード:ubuntu
~/% ssh ubuntu@192.168.11.6
ubuntu@192.168.11.6's password:
Welcome to Ubuntu 16.04 LTS (GNU/Linux 4.1.19-v7+ armv7l)

 * Documentation:  https://help.ubuntu.com/

The programs included with the Ubuntu system are free software;
the exact distribution terms for each program are described in the
individual files in /usr/share/doc/*/copyright.

Ubuntu comes with ABSOLUTELY NO WARRANTY, to the extent permitted by
applicable law.

To run a command as administrator (user "root"), use "sudo <command>".
See "man sudo_root" for details.
ログインできたらSDカードの領域拡張を行います。fdiskコマンドを使って以下のように設定します。
※以降のコマンドは全て「sudo」で実施しています。
# fdisk /dev/mmcblk0
[sudo] password for ubuntu:

Welcome to fdisk (util-linux 2.27.1).
Changes will remain in memory only, until you decide to write them.
Be careful before using the write command.


Command (m for help): d
Partition number (1,2, default 2): 2

Partition 2 has been deleted.

Command (m for help): n
Partition type
   p   primary (1 primary, 0 extended, 3 free)
   e   extended (container for logical partitions)
Select (default p): p
Partition number (2-4, default 2): 2
First sector (133120-30425087, default 133120):
Last sector, +sectors or +size{K,M,G,T,P} (133120-30425087, default 30425087):

Created a new partition 2 of type 'Linux' and of size 14.5 GiB.

Command (m for help): w
The partition table has been altered.
Calling ioctl() to re-read partition table.
Re-reading the partition table failed.: Device or resource busy

The kernel still uses the old table. The new table will be used at the next reboot or after you run partprobe(8) or kpartx(8).
設定終了後に再起動を行います。
# reboot起動後は「resize2fs」コマンドでリサイズします。
# resize2fs /dev/mmcblk0p2
[sudo] password for ubuntu:
resize2fs 1.42.13 (17-May-2015)
Filesystem at /dev/mmcblk0p2 is mounted on /; on-line resizing required
old_desc_blocks = 1, new_desc_blocks = 1
The filesystem on /dev/mmcblk0p2 is now 3786496 (4k) blocks long.
最後にお約束のパッケージのアップデートをしておきます。
# apt-get update
# apt-get upgrade
NTPのインストールと設定
NTPを使って時刻同期をするため、NTPをインストールして設定しておきます。
# apt-get install -y ntp# vim /etc/ntp.conf
#pool 0.ubuntu.pool.ntp.org iburst
#pool 1.ubuntu.pool.ntp.org iburst
#pool 2.ubuntu.pool.ntp.org iburst
#pool 3.ubuntu.pool.ntp.org iburst
pool ntp.nict.jp iburst# systemctl restart ntp
# ntpq -p
remote refid st t when poll reach delay offset jitter
==============================================================================
ntp.nict.jp .POOL. 16 p - 64 0 0.000 0.000 0.002タイムゾーンの設定と時刻の確認
デフォルトのタイムゾーンがUTCになっているので、JSTに変更します。
# timedatectl set-timezone Asia/Tokyo
# timedatectl
      Local time: Sun 2016-08-28 21:38:18 JST
  Universal time: Sun 2016-08-28 12:38:18 UTC
        RTC time: n/a
       Time zone: Asia/Tokyo (JST, +0900)
 Network time on: yes
NTP synchronized: yes
 RTC in local TZ: no
dateコマンドで確認します。
# date「OpenVPNのインストール」に続きます。
